Showing posts with label Baking. Show all posts

Monday, November 19, 2012

Vegan Pumpkin Pie

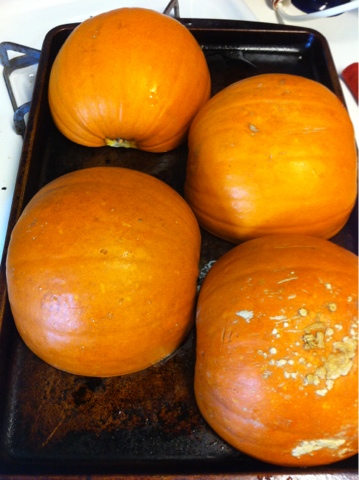
After my battle with the cheese pumpkin I swore off making my own purée. Then I became intrigued by the use of sugar pumpkins in baking. Now that I've come up with an easier way to make purée, I'm swearing off the canned stuff.. at least when pumpkins are in season. The sugar pumpkins make delicious, flavorful purée, that tasted excellent in pumpkin pie.
Sugar Pumpkins 

We have an impostor!
I made the purée by cutting the pumpkins in half and scraping out the seeds. They were placed cut side down on a greased baking sheet and baked for about 30 minutes at 400º. Once cool enough to handle, I scooped out the flesh and puréed in a food processor. This was much easier than peeling and cubing the pumpkin before it was cooked, like I did with the cheese pumpkin.

Scoop out the seeds
Bake cut-side down
They're done when easily pierced with a fork.
For the past couple weeks I have been experimenting with different vegan pumpkin pie recipes to make the perfect pie for thanksgiving. I've finally developed a winner! I couldn't find any appealing vegan recipes online, so I did what I always do and just made my own! Traditional pumpkin pie calls for sweetened condensed milk (or whatever that stuff is called), but I replaced it with a mix of coconut milk and coconut oil. I used a homemade egg replacer, also.

I was worried that this wasn't going to work, since it didn't seem to be cooking through in the oven. I took it out, thinking I had another failure, and left it on the counter overnight. The next day, I decided to have a bite, and it was great! I guess the coconut oil just needed time to solidify. So if you're making this for Thanksgiving I would make it a day or two in advance (like tomorrow.. these holidays keep sneaking up!) and leave it in the fridge. (Update*- I made this again, this time with only 1/4 cup of coconut milk instead of a 1/2 cup. It came out much more solid, and had the perfect consistency of a regular pumpkin pie.)

Vegan Pumpkin Pie
  • 1 1/2 cups of pumpkin puree
  • 3/4 cups sugar
  • 1 Tbsp. flour
  • 1 tsp. pumpkin pie spice
  • Dash of cinnamon and ginger
  • 1/2 tsp. salt
  • 1 egg substitute (see below)
  • 1/4 cup full fat coconut milk
  • 1/4 cup melted coconut oil
I rimmed the edges with fall themed sprinkles.
  1. Preheat the oven to 450º.
  2. In a large mixing bowl, mix the puree and sugar.
  3. Add in the flour, salt and spices.
  4. In a small bowl, whisk up the egg substitute (3 Tbsp of water, 2 Tbsp of flour, 1 tsp of baking powder, and 1/2 tsp of baking soda) until frothy.
  5. Add the egg substitute to the pumpkin mix and stir until combined.
  6. Gently stir in the coconut milk and oil.
  7. Add the mix to a pie crust that has been fitted into a dish. I used my recipe for a galette as the pie crust, but you could use a pre-made crust, too.
  8. Bake for 10 minutes. 
  9. After 10 minutes, turn the oven down to 350º and bake for an additional 35 minutes.
You're just going to have to trust that it's done, since a knife won't come out clean. Just leave it on the counter to cool, move (covered) to the fridge to chill for a day or two before serving. 


Is there anything I can't do?? Ok, I'm done bragging now.

Saturday, September 15, 2012

Peach Galette


I know, I know. I've been posting a lot of peach dishes lately. But as peach season is coming to a close I'm trying to make up for all the lost time I didn't have this summer when I was working so much. I barely had time to make dinner these past few months, let alone dessert. Now that work is done and classes have begun, I've had a lot more time for the fun stuff. That's not to say that grad school doesn't take up a lot of my time as well, but it certainly affords me more kitchen time. In fact, I'm loving everything about grad school.. classes, assignments, professors, new friends, experiences and opportunities.. just to name a few.

Galettes are the answer to the person who likes pie, without liking pie crust. Does that make sense? I love pie filling. Sweet, warm, tender fruit. What's not to love? But I've never been a fan of the crust. Something about it is just unappealing. When eating a slice of pie I usually scrape off the top and the crispy part on the end, and just eat the filling and the bottom crust. A galette is the answer to my pie dilemma, basically only having the parts of pie that I like, with a little extra around the edges.

This was my first attempt at making a vegan galette. Actually, it was my first time making a galette at all. I found a recipe for a plum galette, made a couple substitutions, and came up with this dessert. It was unbelievably delicious with homemade vegan cantaloupe ice cream that I made with cantaloupes from my garden. It's the same recipe as this one that I made a few months ago, but with cantaloupe puree instead of cherries.


Vegan Peach Galette
Serves 6

  • 1 3/4 cups unbleached flour
  • 1 Tbsp. sugar
  • 1 tsp. salt
  • 3/4 cups butter substitute, like Smart Balance
  • 3 Tbsp. ice water
  • 1 tsp. fresh squeezed orange juice (any citrus juice, like lemon, would work also)
  • 1/2 cup sugar
  • 1 vanilla bean, seeds scraped out
  • 2 tsp. corn starch
  • Dash of salt
  • 2 cups of peeled, sliced peaches (about 6 small peaches)
  1. Combine the flour, sugar and salt together in a food processor. I imagine an electric mixer would work just as well.
  2. Put the bowl with the flour mixture in the freezer for about 15 minutes. The trick to a good crust is to keep the dough cold, or so I'm told.
  3. Add the butter sub to the flour and pulse until the dough becomes crumbly.
  4. Add in the ice water and juice, and blend until the mixture still looks crumbly, but holds together when you pinch it between your fingers.
  5. On a floured surface, roll the dough into a circle a little over a foot in diameter, and about 1/8 of an inch thick. 
  6. Wrap this in plastic wrap, and chill in the fridge for at least an hour.
  7. In the meantime, prepare the filling by rubbing the vanilla seeds together with the sugar. 
  8. Stir in the cornstarch and salt.
  9. Toss the peaches in the sugar mixture.
  10. Preheat the oven to 350º.
  11. Unwrap the dough from the plastic wrap, and transfer to a foil lined baking sheet.
  12. Lay the peaches in a spiral pattern around the center of the dough, leaving about 2 inches around the edges.
  13. Fold the edges over the peaches.
  14. Bake for about 40 minutes, or until the edges just begin to brown.
  15. Serve warm, or at room temperature.


Crumble dough, what it should look like after step 3
What the dough should look like after step 4
Rolled out dough
It doesn't have to be perfect
The vanilla and sugar rubbed together. The mixture made a lot,
so I saved some to use in tea.

Folding the edges over, as in step 13
Done!
I'm sure I'll be making this with different fruit
as the seasons change. It would be delicious with
apples I'm sure!

Monday, September 10, 2012

So Long Sweet Summer Peach Cobbler

Peach season never seems long enough to me!
Naked peaches, look away.
We've experienced the first of the fall weather on Long Island. Chilly breezes, crisp air, and the arrival of local fall produce hit Long Island this weekend. After the most humid summer I can ever remember, I'm embracing the change of seasons. Don't get me wrong, I'm a summer girl at heart, but this summer was way too.. sticky. As much as I'm looking forward to the fall, I'll miss the delicious produce that summer has to offer, particularly peaches. There really is nothing like a Long Island peach.

The cool air was welcome this weekend as we ran
the Survival Race 5K.!

A leap off the rock at Big Rock Beach was refreshing after the mud,
but it was freezing on the beach! You can see the clouds that brought
fall with them rolling in.
Sensing the end of the peach season, Logan and I spent a cool morning in a peach orchard, stocking up on the sweet summer fruit. We picked A LOT.


I think the last time I made peach cobbler I was 10. No joke. In 5th grade we were doing a unit on the American Revolution. As an assignment I had to make a recipe from that time period, and Mrs. Jones thought there was nothing more American than peach cobbler. I've been meaning to make it again ever since, but I always end up eating the peaches before they make it into this dish. I didn't have my moms awesome cast iron skillet to make this more authentic, but the stoneware baking dish I had worked well enough.


Vegan Peach Cobbler
Serves 10


  • 6 Tbsp. butter substitute, like smart balance

  • 1 1/4 cups unbleached flour
  • 3/4 cups of sugar
  • 2 tsp. baking powder
  • 1 tsp. cinnamon
  • 1/4 tsp. salt
  • I cup coconut milk (from the carton, not canned)
  • 1/2 tsp. vanilla extract

  • 8 peaches, peeled and sliced
  • Juice from half a lemon
  • 1/2 tsp. vanilla extract
  • 2 Tbsp. sugar in the raw
  • 2 tsp. cinnamon


  1. Preheat the oven to 350º.
  2. Put drops of the butter substitute in a baking dish. The dish I used is about 8 x 12.
  3. Put the dish in the oven until the butter substitute is melted.
  4. Combine the flour, sugar, powder, cinnamon and salt in a large bowl.
  5. Add the coconut milk and vanilla, and stir until just combined.
  6. Pour this mixture over the butter in the dish.
  7. In another bowl, mix the peaches, lemon juice and vanilla together.
  8. Spoon the peaches over the mixture in the baking dish.
  9. Top with cinnamon and sugar.
  10. Bake uncovered for about 50 minutes, or until a knife comes out clean.

Step 2, butter sub in the baking dish.

Step 6, batter over the butter sub
Step 8, peaches on top of the batter
Step 9, cinnamon and sugar topping
Done!

Monday, August 27, 2012

Chocolate Chip Sunflower Butter Bites

Sticky dough in the food processor.
I've been a little obsessed with my new food processor, using it for everything. Even cookies. Yup. Cookie dough in the food processor. These aren't your typical cookies though, these are vegan and gluten free, yet still delicious! The recipe this is inspired from was based with peanut butter. With the prevalence of people with peanut allergies (including my son), there are plenty of substitutes that are almost as good. Almost. The best I've come across so far is sunflower butter. I attempted to grow sunflowers this year to harvest seeds so I could make my own butter, but the chickens are enjoying the leaves too much. Only two plants have survived their plucking, and one of them is only a couple feet tall. It looks like out of all the seeds I planted, I may get one blossoming flower.

While these cookies aren't as rich and satisfying as my vegan chocolate chip cookies, they're a close second and a great gluten free option. Did I mention they don't have processed sugar either? They get their sweetness from honey. And who doesn't like honey?

Oh and don't get turned off by the chickpeas. I know it sounds weird to add chickpeas to cookies, but it's more for texture and substance. You won't taste them at all. Promise.

Chocolate Chip Sunflower Butter Bites
Makes 30 bites


  • 1 can chick peas
  • 1/4 cup honey
  • 1 tsp. baking powder
  • 3/4 cup sunflower butter
  • 2 tsp. vanilla extract
  • 1/2 cup vegan chocolate chips


  1. Preheat the oven to 350º.
  2. Blend all ingredients except the chocolate chips in a blender or food processor until a sticky dough forms.
  3. Add the chips and pulse until just combined.
  4. With wet hands (this is important, otherwise the dough will stick to you), roll the dough into one inch balls and place on greased cookie sheets.
  5. You can fit up to 15 bites per sheet, since these won't spread when baked.
  6. Bake for 10 minutes.


Monday, August 6, 2012

Citrus Zucchini Bread

I know I start almost every post saying the same thing, but I really need to dedicate more time to blogging my recipes. A big reason this blog exists is to have something to look back on. Food plays a big part in almost all social gatherings, and it certainly is a factor of daily life. This blog, while mainly about food, will also serve as a reminder of all the fun, joyful things happening in my life, and will even be an indicator of my daily life. So I really need to keep up on writing, not only for the readers sake, but for my memories as well.

That said, I've been so busy lately that I haven't had much time to create new recipes. Working full time and spending as much time as I can with Logan doesn't allow me much kitchen time. I'm ok with that though, every day with him is something new. He learned to "swim" yesterday. Equipped with water wings, he headed right into the Long Island Sound until his feet no longer touched the bottom. He kicked his legs around and looked adorable while trying to keep his mouth out of the water. A couple times he became completely submerged, and came back to the surface laughing. I'm so lucky to have a baby that absolutely loves the water! He must get that from me.

I'm straying way too far from food here. Back to the recipe. My garden has been extremely productive, especially the squash bed. I ended up with a large harvest of zucchini last week, and my first thought was zucchini bread. I waited longer than I would have liked to pick a couple of the zucchinis, so some of them grew into monsters. One of them shredded into 8 cups, so I doubled this recipe to use 4 cups and froze the rest of the shreds. These are so delicious, I can't wait to make more!


Citrus Zucchini Bread
Makes two 9 x 5 loaves, or about 72 mini muffins


  • 1 lemon
  • 1 cup coconut milk (or other non dairy milk)
  • 4 cups flour
  • 1 1/3 cups of organic sugar
  • 4 tsp. baking powder
  • 1 tsp. salt
  • 1/2 cup apple purée or applesauce
  • 1 cup safflower oil
  • 2 cups shredded zucchini


  1. Preheat the oven to 350º.
  2. Juice and zest the lemon. Keep in mind that it's easier to zest a lemon before it has been juiced.
  3. Put one tablespoon of the lemon juice in a measuring cup. Fill the measuring cup to the one cup line with the non dairy milk. You've just made vegan "buttermilk"! Reserve the rest of the lemon juice.
  4. In a large bowl, mix the flour, sugar, baking powder, salt and salt together.
  5. Add the apple purée, oil, reserved lemon juice and "buttermilk", and stir until combined.
  6. Fold in the lemon zest and zucchini.
  7. Bake mini muffins for about 15 minutes, and bread loaves for about 45.


  8. I covered the mini muffins with an orange glaze,
    made by mixing confectioners sugar and fresh squeezed orange juice.

Thursday, June 21, 2012

The Quest to Find the Perfect Vegan Brownie- Part 3

Ok I've almost got this down. I've been searching for the perfect vegan brownie recipe. I've had a couple near successes so far, with one recipe producing cake like brownies, and another one that was more moist, but not as fudgy as I'm looking for. After a failed attempt or two, I finally came up with these. They're moist, fudgy and rich. A little too rich though, since they're incredibly sweet. It's not too often that I say something is too sweet, but I could only have a few small bites of these before my sweet tooth objected. They really hit the spot when you have a craving for sweets, that's for sure. I have a couple ideas on how to perfect this one, so stay tuned for part 4!

Example of a failed attempt. Not sure what happened here..
Logan is having a great time on this "quest",
especially since he's my official taste tester. The
Christmas decorations in the background are an
indicator of how long I've been at this.


Sweet Brownies!


  • 1/2 cup apple purée or applesauce
  • 2 bananas, mashed
  • 1/2 cup coconut oil, melted
  • 2 cups sugar
  • 1 cup cocoa powder
  • 1 tsp. vanilla extract
  • 1 cup flour
  • 1/2 tsp. baking powder
  • 1/2 tsp. salt


  1. Preheat the oven to 350.
  2. In a large bowl, combine the banana with the apple purée.
  3. Stir in the coconut oil.
  4. Add the rest of the ingredients and stir until combined.
  5. Pour the batter in a greased 8 x 8 pan and bake for 40 minutes, or until a knife comes out clean.

Sunday, June 17, 2012

Cantaloupe Bread

I adapted this bread from a recipe sent to me by my creative culinary coworker, Terra. She saw cantaloupes ripening past their prime one day and made bread with them. Genius! The second she told me about them I knew I had to make a vegan version. Logan loves cantaloupe!


Cantaloupe Bread
Makes 2 loaves
  • 2 cups cantaloupe, mashed
  • 1 cup organic sugar
  • 1/2 cup packed brown sugar
  • 1/2 cup safflower oil
  • 3 cups unbleached flour
  • 1 tsp. salt
  • 1 tsp. baking soda
  • 1 tsp. baking powder
  • 1tsp. cinnamon
  • 1/2 tsp. ginger
  • 1 Tbsp. vanilla extract
  • Egg replacer (replaces 3 eggs):
    • 9 Tbsp. water
    • 6 Tbsp. unbleached flour
    • 1 Tbsp. baking powder
    • 1 1/2 tsp. baking soda
  1. Preheat the oven to 350º.   40 minutes
  2. Combine all ingredients except the egg replacer in a large bowl and mix until combined.
  3. In a small bowl, whisk together the egg replacer until thick and foamy.
  4. Add the egg replacer to the rest of the ingredients and stir until incorporated.
  5. Pour into two greased 9 x 5 bread pans, and bake for 40 minutes, or until a toothpick comes out clean.

Saturday, May 12, 2012

Lilac Muffins

Spring has never been more delicious!

Lilacs are my absolute, hands down favorite flower. The smell, the delicate purple color, the tiny blossoms, I love it all. My favorite time of year is when the lilacs bloom in May (or April as it was this year). Andrew knows how much I love them, so he bought me a bush on my first birthday that I celebrated with him, and planted it in my parents yard. I told him I would love him as long as lilacs bloom in spring. I know, I'm so romantic. Well the bush hasn't bloomed since that first year, but I still love him! (Does anyone have any idea why a lilac bush wouldn't bloom btw? It's growing fine, it just doesn't flower). We have a small bush outside of our bedroom window now, and even though I avoid opening that window because of my allergies, I make an exception when the bush is in bloom. I hate how short the blooming season is though. The blooms are on their way out, so get on this recipe right away! I never thought to bake with lilacs. It didn't ever cross my mind that they could be edible until I came across the recipe that I adapted this from. I switched out eggs, milk and butter for healthier, vegan ingredients, and topped the muffins with a thinned out version of my vegan buttercream icing and candied lilac blossoms. If you're looking for something unique, pretty and delicious to make for Mother's Day, look no further. This recipe is perfect.

The lilac blossoms on their own are pretty bitter. I thought the muffins would take on that taste, so I iced them to add some sweetness. It turns out they're not so bitter once they're baked, so the muffins tasted fine on their own. Feel free to skip the icing and candied lilacs, but they do make for a nice presentation. And candying the lilacs makes them "taste exactly like they smell", according to my brother Jesse.


Lilac Muffins
Makes 6 muffins
  • 1/4 cup of coconut oil, melted
  • 1/8 cup of apple puree or sauce (or 1 cube if you freeze the puree in ice cube trays)
  • 1/4 cup of Turbinado sugar
  • 1/2 cup of almond milk
  • 1 cup of unbleached flour
  • 1 1/2 tsp. of baking powder
  • 1/4 tsp. salt
  • 1/2 cup of lilac blossoms, stems removed
  1. Preheat the oven to 350º.
  2. Hand mix all the ingredients besides the blossoms in a mixing bowl until well blended.
  3. Fold in the lilacs.
  4. Spoon the mixture into 6 greased muffin tins.
  5. Bake for 20 minutes.
  6. When cooled, top with icing and candied blossoms (recipe below).


Vegan "Buttercream" Icing
Ices 6 muffins

  • 1/4 cup of vegetable shortening
  • 1 cup of powdered sugar, divided
  • 1 tsp. of vanilla extract
  • 2 tsp. water (this is the thinned out version, to make the original, use only 1 tsp. of water)
  1. Cream the shortening and 1/2 of the sugar with an electric mixer.
  2. Add the rest of the sugar, vanilla and water and cream until smooth.

Candied Lilac Blossoms
Makes about 1/2 cup of simple syrup.. which will candy a lot of blossoms

  • 1/4 cup of water
  • 1/2 cup of granulated sugar, plus extra for dusting (I tried to use organic for dusting, but the blossoms came out kind of brown and rotten looking, so this might be the only time I say this, but skip the organic version. This also makes it non-vegan, since it's bone char that whitens the sugar). 
  • Lilac blossoms, stems removed
  1. Heat the water and 1/2 cup of sugar in a sauce pan over medium heat, stirring occasionally, until the sugar is completely dissolved to create the simple syrup.
  2. Set aside to cool to room temperature.
  3. Once cool, dip blossoms in the simple syrup using (clean!) tweezers.
  4. Blot off the excess syrup on the handle of the wooden spoon, and dip in sugar.
  5. Place on a sheet of wax paper to harden.


Thursday, April 12, 2012

Banana Oat Cookies

I make these as a healthy snack or dessert for Logan, but they go pretty quickly since everyone else can't keep their hands off them, including me. They never held together well though, so I pretty much had to follow Logan around with a broom. But in a stroke of genius, I used coconut oil instead of safflower, in hopes that the cookies wouldn't crumble as easily. It worked!

There is no added sugar in this recipe, making it the perfect snack for kids, and even adults who are looking for a heathy alternative to regular cookies. They're a breeze to make, and have only 5 ingredients.


Banana Oat Cookies
Makes about 3 dozen


  • 3 ripe bananas, mashed
  • 2 cups rolled oats
  • 1/2 cup dried blueberries
  • 1 tsp. vanilla extract
  • 1/3 cup coconut oil, melted


  1. Preheat oven to 350º.
  2. Mix together all the ingredients in a large bowl.
  3. Let the mixture sit for 15 minutes. The coconut oil needs time to solidify and hold the cookies together.
  4. Drop the mixture on greased cookie sheets.
  5. Bake for around 17 minutes, or until the cookies start to brown on the sides.

Monday, April 9, 2012

Happy Easter

I hope everybunny had a hoppy Easter!


My mom used to make a bunny cake like this every Easter when we were younger. I kept the tradition alive by tripling the recipe for blue moon orange cupcakes (minus the beer this time) and baking for about 35 minutes in two 8 inch round pans, and frosted it using vegan buttercream icing. Yum!

Thursday, April 5, 2012

The Quest to Find the Perfect Vegan Brownie- Part 2

Continuing my quest, I found a recipe on allrecipes.com that used, of all things, zucchini. I was skeptical about it, but at this point I'll try anything to find fudgy, rich vegan brownies. Besides, I had some shredded zucchini in the freezer left over from zucchini bread. After mixing all the other ingredients, I realized I only had about half the zucchini that I needed. So I divided the batter in half, added zucchini to half the mix, and apple purée to the other, ending up with two types of brownies.

While they're not exactly what I'm looking for, they're pretty darn close. They were moist and chocolatey, but not as fudgy as I would have liked. Still, they're the closest I've come to an ultimate vegan brownie so far. Both the apple and the zucchini batches were good, but I preferred the zucchini a tiny bit more.


Vegan Zucchini Brownies


  • 1/4 cup oil
  • 3/4 cups sugar
  • 1 tsp. vanilla extract
  • 1 cup flour
  • 1/4 cup cocoa powder
  • 3/4 tsp. baking soda
  • 1/2 tsp. salt
  • 1 cup shredded zucchini


The batter will look pretty dry before you
add the zucchini, as you can see in the
bowl on the left.

  1. Preheat the oven to 350º.
  2. Mix the oil, sugar and vanilla in a large mixing bowl.
  3. Add the flour, cocoa, baking soda and salt, and mix until combined.
  4. Fold in the zucchini
  5. Pour batter into a greased pan. Since this recipe only makes a small amount of batter, I used a glass 8 x 6 Pyrex dish.
  6. Bake for about 25 minutes, or until a knife comes out clean.