Wednesday, February 29, 2012

Vegan Tian

Yellow, green, potato, tomato. Yellow, green, potato, tomato. Yellow, green, potato, tomato.

That's what I was saying over and over in my head as I assembled this dish. The inspiration for this recipe came from pinterest. I swapped russet potatoes for sweet potatoes, omitted some animal ingredients, and ended up with a delicious vegan tian.

Thank goodness for the slice-o-matic. It cut perfectly even slices in seconds. Prep time was no more than 20 minutes. I can't wait until squash and tomatoes are in season this summer. I'm sure this will taste even better when I use veggies grown in my own backyard!

Vegan Tian
Serves 4 


  • 1 medium onion, sliced
  • 1 garlic clove, crushed
  • 2 Tbsp. olive oil
  • 2 small sweet potatoes, sliced
  • 1 yellow squash, sliced
  • 1 green squash, sliced
  • 2 Roma tomatoes, sliced
  • Fresh or dried thyme


  1. Preheat the oven to 350º.
  2. Sauté the opinions and garlic in the oil until the onions become soft, about 10 minutes.
  3. Spread the sautéed onions and garlic in the bottom of a pie dish.
  4. Working in a spiral pattern, layer the veggies on top of the onions.
  5. Sprinkle and garnish with thyme.
  6. Cover with foil and bake for 45 minutes.
  7. Serve warm.

Saute the onions until they are soft
 and just beginning to brown.
Start layering.

Tuesday, February 28, 2012

Roasted Garlic Soup

I clipped this recipe from a newspaper a few months ago. Garden of Eve, an organic farm on the north fork of Long Island, holds a garlic festival every September. The festival was coming up, and I was keeping my eye out for garlic themed recipes. I'm so glad I found this one! I love everything about garlic; its taste, smell, health benefits. Roasting the garlic, like you do in this soup, really enhances the flavor (and makes the house smell great!).

For weeks now I've been meaning to make a batch to keep in the freezer. This soup is perfect for colds, especially since garlic has antiviral and antibacterial properties. I don't know how effective garlic is once it's been roasted and once you're already sick, but the soup is at least comforting. I made a few substitutions, like oil for butter, to make it vegan. The original recipe called for heavy cream, but it's still rich and creamy (and much more healthy) without it.

When I made this yesterday morning, it took a lot of willpower not to eat a bowl right away. As much as I love garlic, I know not everyone does. I was going to a spin class and as a courtesy to the other spinners, I didn't want to be sweating garlic. What I'm getting at is, after eating this soup, you're probably going to stink. I didn't notice it last night after dinner since we all ate it, but when Logan had a bowl for lunch today he really reeked!

*The key to this recipe is roasting the garlic. To make it easier to extract the actual clove once it's roasted, cut off the top of two whole heads, exposing the cloves. Place the cut heads on a piece of tinfoil with a couple bay leaves. Drizzle with a couple tablespoons of olive oil, and wrap it up. Roast in the oven at 350º for 45 minutes.


When the 45 minutes is up, remove the foil packet from the oven and let it cool slightly. Over a bowl, squeeze the heads so that the cloves are released from the husk. 

The roasted garlic cloves in the bowl, and the husks on the foil.


Roasted Garlic Soup
Makes about 6 servings

  • 2 heads of garlic
  • 2 bay leaves
  • 4 Tbsp. olive oil, divided
  • 2 medium yellow onions, chopped
  • 1 large potato, diced
  • 3 carrots, sliced
  • 2 stalks of celery, diced
  • 4 cups vegetable stock
  • 1/2 cup dry white wine
  • Salt and pepper, to taste
  1. Roast the garlic. See above for directions*
  2. In a large pot, saute the onions in 2 Tbsp of oil until translucent, about 5 minutes.
  3. Add the rest of the ingredients, including the roasted garlic, and mix well. 
  4. Bring to a boil.
  5. Lower heat and simmer covered until the potatoes and carrots are tender, about 30 minutes.
  6. Transfer batches to a blender using a slotted spoon, and blend until smooth.


Sunday, February 26, 2012

Irish Morning Juice

As delicious as they are, I'm getting a little tired of Bloody Nikkis. It's time to find a new juice. I started today by using an assortment of stuff in the fridge. Carrots were definitely getting juiced since I have way too many of them. I also have a lot of celery, since I'm trying to grow new stalks from the base of an old one. I heard you can propagate celery that way. I'll let you know how it goes.
Soak in a shallow dish of water.
This is as far as I got, since I forgot to plant it today.
I'll keep you posted on its growth.
To propagate from an existing stalk,
cut the stalks off just above the base.

Apples seemed like a good addition, and on a whim I threw the liquid part of the coconut milk I had leftover from making coconut whipped cream. this may have made the juice too sweet, so I won't be doing that again. Other than being sweet, it wasn't too bad. Leave the coconut milk out if you want to skip the sweetness.

I have a question for you juicers. When you juice an apple, do you core it first, or do you throw in the whole apple, seeds and all? I know some people include the seeds, but don't they naturally contain arsenic? That doesn't seem appetizing.

I'll be trying different juices until I find the perfect one, so juicers stay tuned!


Irish Morning Juice
Makes 2 servings


Before stirring, the green and orange reminded
me of the Irish flag, thus inspiring the name of this juice.

  • 1 apple, cored
  • 2 carrots
  • 2 celery stalks
  • A couple Tbsp coconut milk liquid


  1. Juice.
  2. Sip.
  3. Enjoy.

Saturday, February 25, 2012

Pizza Hummus

I saw a recipe for pizza hummus on Pinterest. Thinking it too good to be true, I had to try it right away. I didn't have some of the ingredients, so I improvised. Now that I look back at the original recipe here, I improvised a lot. It still tasted like pizza though! Ok maybe it doesn't taste like you're biting into a slice of delicious NY pizza, but you still get a pizza like taste without all the calories. Besides, it's hummus.. hummus is always good. This was good eaten with carrots, celery, and pita bread. I bet it would be really good with pretzels, too. 


Pizza Hummus

  • 1 15 oz can of chick peas, drained
  • 4 Tbsp. olive oil
  • 1/4 cup plus 2 Tbsp of tomato paste
  • 2 Tbsp. nutritional yeast
  • 1 garlic clove
  • 1 1/2 tsp. dried basil
  1. Combine all the ingredients in a blender or food processor. 
  2. Blend until smooth.
  3. Chill in the fridge before serving.

Pumpkin Seed Cilantro Pesto

The mild weather we've been having this week really has me looking forward to summer. Traditional pesto is one of my favorite summer meals. I've been craving it, but fresh basil is hard to come by this time of year (summer please hurry!). A quick Internet search turned up a recipe for a pumpkin seed pesto. I didn't have all the ingredients, so I searched for a few more similar recipes and decided to combine them using what I already had.

The result was very interesting. At first all I could taste was the cilantro. Like swamp soup, this is a recipe for cilantro fans. After I few seconds I started to taste the pumpkin seeds. The nutritional yeast and garlic added a kick to the flavors to give this dish a unique taste. It's no basil pesto, but it'll do until I get those basil plants growing!

I planned on eating this with spaghetti squash, assuming I had one. It was actually a butternut squash that I had, so I served this over pasta instead. I ate this cold, but it was just as good warm when I ate the leftovers the next day.

Pumpkin Seed Cilantro Pesto
Makes 4 servings


  • 2/3 cup raw pumpkin seeds
  • 1 bunch of cilantro, thick stems removed
  • 4 Tbsp. olive oil
  • 1 Tbsp. nutritional yeast
  • 1 garlic clove
  • Dash of salt
  • Roasted red peppers for garnish


  1. Combine all ingredients (except the peppers) in a blender or food processor and blend until smooth.
  2. Serve over pasta or spaghetti squash, and garnish with roasted red peppers and extra pumpkin seeds.


Sunday, February 19, 2012

Ginger Snaps

I made these a few weeks ago. It's been in my archive of vegan recipes to blog about, and today is the perfect time to write about them. I bought fresh ginger specifically for this. I had a small piece lying around from making real home made ginger ale, but stocked up on more roots in anticipation for this recipe. I'm so glad I did, since it helped me combat the stomach virus that attacked Logan last night. It was the first time he ever got really sick, so it was scary and stressful for both of us. After his first bout of nausea (at 1 in the morning- of course) I crushed up some of the root and added it to water in his sippy cup. I put a little extra ginger juice on his pacifier and he was over the sickness by 3 am. I'm convinced it would have gone on longer if I didn't have the ginger in my arsenal. 

Anyways, back to the real reason I bought the ginger. My friend Nikki gave me a recipe for ginger cookies. I really wanted to try it, but I didn't have molasses in the cabinet (nor will I ever again, since I found a great substitute- more on that in a minute). Turning to the internet, I tried to google a recipe for ginger cookies without molasses. I couldn't find one that didn't have it, so I got creative. At this point I forgot all about Nikki's recipe, and used one that I found somewhere on the internet. This recipe called for molasses, but I took a chance and made my own. I started by putting 3 Tbsp. of brown rice syrup (I use the organic Sweet Dreams brand, I hope that's not one of the brands containing alarming levels of arsenic. I haven't been following that story too well) in a measuring cup and adding brown sugar until I had 1/4 cup of the mixture. It wasn't exactly molasses, but it worked. 

With a few changes to the original recipe to make it vegan, the addition of fresh ginger, and a substitute for molasses, I ended up with ginger snaps. Not the intended result. At first I thought the recipe was a bust. The cookies ended up spreading really thin on the baking sheet, so they came out flat and crisp. They weren't the chewy, soft cookies I was expecting. I kept them anyways, since Logan seemed to like them. A couple days went by with me just staring at them on the counter, occasionally passing one to Logan. I don't know what made me try one, but they were delicious! They definitely had a bite to them, the ginger being the prominent taste, but it was balanced nicely by the rest of the ingredients. It took me a couple days to realize that just because they didn't come out how I expected, it didn't mean that they weren't good. I'm glad this recipe made so many, because I couldn't get enough of them.

Ginger Snaps
Makes 6 dozen
  • 2/3 cup safflower oil (vegetable oil works too)
  • 1 cup granulated sugar
  • 1/4 cup apple puree
  • 3 Tbsp brown rice syrup
  • < 1/4 cup of brown sugar
  • 2 cups flour
  • 1 tsp. ground cinnamon
  • 1 Tbsp freshly grated ginger
  • 1/2 tsp. salt
  1. Preheat oven to 350º.
  2. Mix oil and sugar in a large bowl.
  3. Add apple puree and mix well.
  4. Put brown rice syrup in a 1 cup measuring cup, and add brown sugar up to the 1/4 cup mark. Add this to the bowl and mix well.
  5. Add the dry ingredients and mix until combined. 
  6. Pour a small amount of granulated sugar in a bowl. Form a tsp of dough into a ball and coat with the sugar. 
  7. Place dough on a greased cookie sheet, and bake for about 7 minutes. 

Keep your eye on these while they're baking. I burnt the first couple batches since the original recipe had them in for 15 minutes. Also, don't make the dough balls too big, or you'll end up with a full sheet of flat cookies, like this one.


Thursday, February 16, 2012

Gone Bananas

The first place I go when I walk into Stop and Shop is the cart of produce "seconds". It's a cart they put out full of produce that needs to be sold and consumed ASAP. I often find large bunches of organic bananas for 50 cents on there, and go, well.. bananas. I buy just about every single package on there. Bananas are easy to mash and freeze, I have plenty of recipes for them, and Logan eats at least 2 or 3 a day. They're by far his favorite food.


I've been meaning to make a vegan banana bread for awhile now. I have a recipe from my mom that was passed down from her grandma. It's an instant favorite and is always requested at family gatherings. Making it vegan was very simple. I substituted oil for butter and apple puree for eggs. Mom usually adds chocolate chips, which is the icing on the cake. Everything tastes better with chocolate! I used half of an Endangered Species Chocolate bar, to keep it animal product free. The bread came out amazing. It tastes just like the original. The only difference is the color, which is a few shades paler than the non vegan version. I only made one loaf, but I wished I made more. Logan keeps going up to the counter and saying "cake". I'm glad to have his approval!

Banana Bread
Makes one loaf

  • 3/4 cups granulated sugar
  • 1/4 cup safflower oil (you could use vegetable oil too)
  • 1/2 cup apple puree
  • 1 cup of mashed banana (about 2 1/2 small bananas)
  • 2 cups flour
  • 2 tsp. baking powder
  • 1/2 tsp. salt
  • 1/4 tsp. baking soda
  • 1.5 oz of vegan chocolate, chopped
  1. Preheat the oven to 350º.
  2. Mix the sugar, oil, apple and banana in a large bowl.
  3. Add the flour, powder, salt and soda. Mix well.
  4. Fold in the chocolate.
  5. Grease a 9 x 5 loaf pan, and fill with the batter.
  6. Bake for 45 - 50 minutes, until a knife or toothpick comes out clean.

I still had a lot of bananas leftover, so I pulled out the dehydrator and made banana chips. I sliced 5 bananas very thin (about 1/8 of an inch), dipped them on a plate sprinkled with cinnamon, and placed them on the dehydrator trays. They took forever to dry, about 10 hours.


I put some of the dried bananas in a jar to have on hand for a snack. The rest I crushed up and added to some organic green tea. I buy loose tea from a cute little tea shop called You, Me and Tea in Port Jeff. It gave the tea a very subtle banana flavor, but it was hardly noticeable. I can't wait to try the same thing with strawberries this spring!

Wednesday, February 15, 2012

Valentine's Day Brunch

I hope everyone felt the love yesterday! I definitely did. I got so many kisses from Logan, got to see one of my best friends, and had a wonderful day with Andrew. I don't care how many people call it a "hallmark holiday" or complain about it for whatever reason.. Scrooges. I like any excuse to get dressed up, go on a date, get flowers and feel extra loved. We skipped hallmark this year anyways and made our own cards, much more sustainable and less wasteful than those commercial cards that usually get tossed in the garbage. I got an idea from pinterest (where I seem to be getting all my ideas these days), and made cards out of Logan's drawings.


Megan, who I've been friends with since forever (we can never figure out how long we've known each other for), came for a vegan brunch in the morning, since she was taking Logan on a date as her valentine. I made heart shaped pumpkin pancakes by scooping batter out with a 1/4 cup measuring cup and pouring it in a "V" shape on the griddle. They came out much better than I thought! With more "pinspiration" I made a couple creative fruit platters, along with a vegan whipped cream using only two ingredients.


Coconut whipped cream


  • 1 can coconut milk (not the lite stuff)
  • Cinnamon, to taste
  1. Refrigerate the can of coconut milk overnight. The liquid will separate, and you will be left with a semi solid chunk of coconut.
  2. Remove the solid portion with a spatula and/or fork and transfer to a bowl.
  3. Whip the coconut into a cream using a whisk.
  4. Add cinnamon, starting with 1/2 a tsp and adjust according to your taste.
Don't throw out the liquid after removing the solid.
Add it to a smoothie or drink it straight.
While not as flavorful as whipped cream, it's still pretty good, and it's definitely healthier. I forget where I was reading this article, but a British chef was saying how Americans have lost their taste for the "subtle". It's true. It seems that unless it's packed with flavor, it's not considered tasty. I hope to break that stereotype and train my palette to appreciate everything along the flavor spectrum. 


Meditazione, meaning "meditate" in Italian.
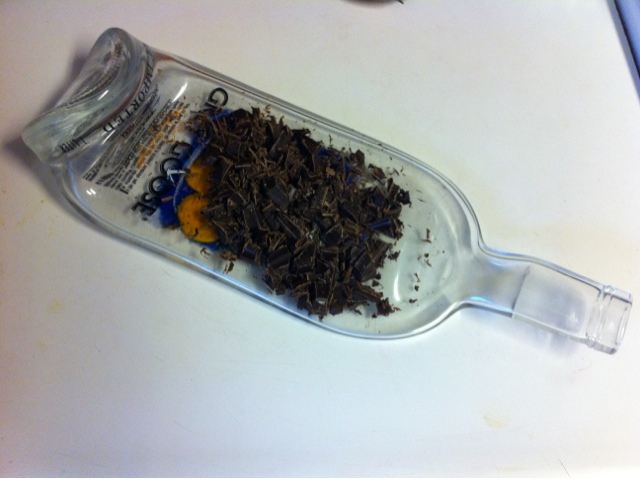
Andrew and I took our date all the way east to Bridgehampton. Around Christmastime I heard about a new type of wine. It's actually not all that new, but it's something that's recently come back to modern day vineyards. It's not a white, nor a red nor a rose, but it's an orange wine. It's only being fermented in a few places in the world, and we're lucky enough to live about an hour away from Channing's Daughters, one of it's producers. The drive was totally worth it, I've never tasted a wine like that in my life! It tasted like a white, but with characteristics of a red, and it had a unique orange color. We sampled two different types, Envelope and Meditazione. The latter was so delicious that we bought a bottle to bring home. This is a must try for anyone who appreciates wine!
I'm so glad my forsythias were in bloom for Vday.
I took branches from a tree at my moms and placed them in
water. It took 2 weeks, but they're worth the wait!
Photo cred Meg_Shut. Find her on Instagram.

Sunday, February 12, 2012

Crock Pot Chili

This recipe is one of my favorites for several reasons. First, it's a filling, hearty, vegan meal. The ingredients are very basic and the prepping is minimal. It makes so many leftovers that I usually end up freezing a Pyrex container full to thaw when I'm sick and have no interest in cooking. Best of all, it's made in the crock pot. I love having the sense that dinner is "done" when it's not even noon yet.

I made the chili this weekend when Andrew and I had friends over. The kitchen turned into a disaster area pretty quickly. Andrew was brewing two batches of beer and I was teaching Yvonne how to make blue moon orange cupcakes. After an hour or so it was hard to believe there was countertops and a table underneath all the mess, so I was especially relieved that dinner was already made and the crock pot was already cooking.

The ingredients of this chili change every time I make it. It's a versatile recipe, so I basically use what I have available. This particular batch came out great, probably the best it's ever been, so I better write this down before I forget. Andrew agrees, he said this was the most "amazing" it's ever tasted. Derek said it tasted just like the one he makes, which has meat, and Yvonne said she didn't even notice that meat was missing. I guess this is a good recipe to make for meat lovers and animal lovers alike.


Crock Pot Chili
Serves at least 8

  • 2 Tbsp. oil
  • 1 green bell pepper, seeded and cut into strips
  • 1 red bell pepper, seeded and cut into strips
  • 1 jalapeno pepper, seeded and diced
  • 2 medium sized yellow onions, diced
  • 4 garlic cloves
  • 10 oz. frozen spinach
  • 1 15 oz can of black beans, drained and rinsed
  • 1 15 oz can of red kidney beans, drained and rinsed
  • 1 15 oz can of chick peas, drained and rinsed
  • 2 yellow squash, diced
  • 30 oz can of diced tomatoes
  • 2 6 oz. cans of tomato paste
  • 1 cup vegetable broth
  • 6 Tbsp. chili powder
  • 1 Tbsp. ground cumin
  • 1 Tbsp. oregano
  • 1 Tbsp. parsley
  • 1/2 tsp. salt
  • 1/2 tsp. pepper
  1. Saute the oil, peppers, onions and garlic in a pan until the peppers start to soften, about 5 minutes.
  2. Add the spinach and saute until mostly thawed, just another 2 or 3 minutes.
  3. Add to the crock pot along with the rest of the ingredients. 
  4. Cook on a low setting for a minimum of 4 to 5 hours.

If you plan on serving this to kids who don't like or can't handle "spicy", mix everything in the crock pot except the chili powder and cumin. Transfer some to a pot and cook slowly on the stove top. Add the chili powder and cumin to the crock pot and continue cooking. This isn't very spicy to begin with, but my toddler cried for about an hour after he ate it the first time he tried it. I felt so terrible!

Sticking with a southwestern theme for the day, I also made guacamole. I came to love the stuff in college when my mom always sent me back to school with a batch after coming home for the weekend. In a college dorm it was pretty hard to come by fresh tomatoes, garlic, onions, peppers, etc.. so I improvised and used salsa. Some people, especially you die hard guac fans, would think this is cheating, but it works. It's my go-to recipe for a quick easy snack or for last minute company. 

Easy Peasy Quacamole
Serves 4


  • 2 avocados
  • Juice from 1 lime
  • 2 Tbsp. salsa
  1. Cut the avocado in half and remove the seed. 
  2. Scrape out the flesh into a bowl.
  3. Add the lime juice and mash to the desired consistency using a potato masher or a fork.
  4. Stir in the salsa.
  5. Serve with tortilla chips.

Wednesday, February 8, 2012

Spicy Black Bean Dip

I originally thought this recipe was a disaster. It was watery and tasted bleh. I found it somewhere online while I was looking for a vegan dip for the Super Bowl. Originally the recipe called for a chipotle chili and adobo sauce, which I skipped and subbed with salsa. I didn't want to make it too spicy so Logan could at least try it. I made it late at night the day before the game. The blender kept waking Logan up, so I stopped trying to make it work and gave up. The dish was covered and put in the fridge. For some reason I decided to put it out the next day anyways, and was glad I did! Chilling it in the fridge thickened it up to more of a dip consistency, and the flavors had time to blend together and enhance themselves. The dip was smooth, spicy, even a little smoky. All around pleasing to the palate. 


Spicy Black Bean Dip

  • 1 15oz. can black beans, drained and rinsed
  • 1 garlic clove
  • 1/2 of a small shallot
  • 2 Tbsp. salsa
  • Juice from 1/2 a lemon
  • 1/4 tsp. cumin
  • 1/4 tsp. chili powder
  • 1/2 tsp. salt
  1. Combine all ingredients in a blender and blend until smooth.
  2. Transfer to a bowl with a lid and chill in the fridge.
  3. Serve with carrot sticks, celery or chips.

Monday, February 6, 2012

Blue Moon Orange Cupcakes

These may have been the tastiest cupcakes I've ever created. They're light, fluffy, and packed with flavor. Who knew that beer went so well with cupcakes? I saw these on Pinterest, another social media site that I'm completely addicted to. Between blogging, pinning, and facebooking I've been spending way too much time online. I even started using my laptop again, something I haven't really used since graduating college. Like everything else on this blog, these cupcakes are vegan. Even the beer is vegan.

I started Saturday night to prepare for yesterday's Super Bowl. We had a lot of cooking to do the day of, so anything that could be done the night before was. Once again I turned to allrecipes.com for a vegan cupcake recipe. They had a great one using coconut oil and apple cider vinegar instead of butter and eggs. I added some zest from a naval orange, which added a sweet kick to the cupcakes. Zest from the same orange was used to flavor the icing, the recipe for which can be found at the bottom of this page


Beer doesn't always bake well, so before the cupcakes were iced, I poked holes in the top of them with a toothpick and brushed them with Blue Moon using a pastry brush. You couldn't really taste the beer (the orange flavor dominated), so if you're a fan of Blue Moon I suggest not only brushing the cupcakes with a lot of beer, but also using it in the icing. To thin the icing I usually use water, but next time I'll add a Tbsp of beer. This batch made 9 cupcakes, and they're gone already. Logan and I just split the last one.. and I just realized I gave my 15 month old beer. Oops. I'll keep an eye out for clumsy, wild behavior. Oh wait, he's always like that.


Blue Moon Orange Cupcakes
Makes 9 cupcakes

  • 1/4 cup coconut oil, melted
  • 1 1/2 Tsp. apple cider vinegar
  • 3/4 cups almond milk
  • 1 cup flour
  • 1/2 cup granulated sugar
  • 1 tsp. baking powder
  • 1/4 tsp. baking soda
  • 1/4 tsp. salt
  • 3/4 tsp. vanilla extract
  • 1 1/2 tsp. orange zest
  1. Preheat the oven to 350º.
  2. Melt the coconut oil. I do this by putting the oil in a small glass dish, and placing it in a saucepan full of water over the stove. Just make sure the water doesn't come above the top of the glass dish. See the picture below.
  3. Pour the vinegar in a 2 cup measuring cup. Add almond milk up to the 3/4 cup mark. Let stand for 5 minutes, or until curdled.
  4. Mix the flour, sugar, powder, soda and salt in a large bowl.
  5. Add the coconut oil and vanilla to the almond milk mixture.
  6. Pour the wet ingredients into the bowl with the flour mixture, and mix well.
  7. Fold in the orange zest.
  8. Pour into a greased muffin tin (makes 9 muffins).
  9. Bake for 15 minutes.
  10. Once cooled, poke holes in the top of the cakes with a toothpick and brush with beer.
  11. Make the frosting. Mix 1 tsp of orange zest into the icing, and thin with a Tbsp of beer (instead of water).
  12. Frost cupcakes, and top with orange wedges.


Coconut oil melting on the stove
Everything ready to be mixed

Another Super Bowl idea I saw on Pinterest. I usually wait until spring to eat strawberries, there's nothing like a Long Island strawberry! These were so cute though I couldn't resist. We did our shopping at Pathmark, which doesn't carry the vegan Endangered Species chocolate. I did find that Ghirardelli 72% cacao from their all natural Intense Dark line doesn't contain milk fat or any other animal product. The "laces" were added with Wilton's cookie icing that I had leftover from decorating Christmas cookies. 


Melt the chocolate in a bowl inside a pot of hot water.
Make sure the strawberries are very dry before dipping
them, or else the chocolate won't stick.

Saturday, February 4, 2012

Vegan Whole Wheat Pumpkin Pancakes with Cinnamon Syrup

I found a great recipe for vegan pancakes on allrecipes.com, added pumpkin purée to it and struck gold. It's quick, easy to make, and you most likely have everything you need to make it already in the cabinets. No worries if you don't have pumpkin, they're still great pancakes without it. I made a cinnamon syrup to go with it, another recipe I got from allrecipes.com. I made some changes to the original recipe, like adding less sugar, more cinnamon, and omitted the flour. These have become favorites in our house, and I've made them time and time again.


Whole Wheat Pumpkin Pancakes
Makes 12 small pancakes

Logan chowing down on an "L" shaped pancake on his first birthday
  • 1 1/4 cups whole wheat flour
  • 2 Tbsp. sugar
  • 2 tsp. baking powder
  • 1/2 tsp. salt
  • 1 cup water
  • 1 Tbsp. safflower oil (canola or olive oil would work here too)
  • 1/2 cup pumpkin puree
  1. Mix everything into a large bowl.
  2. Heat a lightly oiled griddle over a medium flame. Drop about 1/2 cup of batter for each pancake onto the griddle. 
  3. Flip the pancake when bubbles begin to form and the edges start to brown.
  4. Enjoy with mimosas.


Cinnamon Syrup
Serves about 8*
  • 1/2 cup turbinado sugar (or white sugar if that's what you have)
  • 1/2 cup packed brown sugar
  • 1 tsp. cinnamon
  • 1 tsp. vanilla extract
  • 1 cup water
  1. Stir all ingredients in a small saucepan. 
  2. Bring to a boil and stir until it thickens to the consistency of syrup.
  3. Remove from heat and cool for a few minutes before serving. 

*Any extra can be stored in the fridge and reheated before each use. I store extra in old Frank's Hot Sauce bottles. We put hot sauce on a lot of our food, so we have plenty of those bottles lying around!

Herbed Rice Stuffed Acorn Squash

This is another Elyssa original. The cupboard is pretty bare, so I had to get creative. Andrew wanted squash and quinoa salad. I didn't have quinoa, so I planned to substitute brown rice. Then I remembered what a pain peeling and cubing the acorn squash was, so I decided to just stuff it. It seemed too plain, so I spiced up the rice by adding dried herbs. You can add just about whatever suites you. I used oregano, basil and parsley, and threw in some garlic and onion powder. Feel free to use fresh herbs if you're feeling ambitious (as I clearly wasn't), it'll probably taste better anyways. Andrew topped his with honey lime sauce, and I ate mine with a mustard vinaigrette (I'll post the recipe below) I had left over from another dish. Both tasted great!


Herbed Rice Stuffed Acorn Squash
Serves 3

  • 3 acorn squash
  • Brown rice (2 servings)
  • 3/4 tsp. dried parsley
  • 3/4 tsp. dried oregano
  • 3/4 tsp. dried basil
  • 1/2 tsp. onion powder
  • 1/2 tsp. garlic powder.
  • 1/2 of a 15 oz. can of black beans, rinsed and drained.
  1. Prepare the squash. Cut the little nib off the bottom to make a flat surface for the squash to sit on. Cut off a small piece of the top. With a knife, carve a hole in the top of the squash to expose the inner cavity with the seeds. Scrape out the seeds. 
  2. Place the squash upside down in a baking tray with about 1/2 and inch of water. Bake in a 400º oven for 40 minutes, or until the squash is easily pierced with a fork.
  3. Make the brown rice according to the package directions. Once the water boils, add the herbs and onion and garlic powders. 
  4. Once the rice is cooked, stir in the black beans.
  5. Stuff the rice mixture inside the squash.
  6. Top with a sauce like honey lime sauce or mustard vinaigrette. 
  7. Enjoy warm.
The squash with the bottom cut off upside down in a baking tray
The squash should look like the one to the right before going in the oven. The center squash still needs a hole in the top and its seeds removed.


Mustard Tarragon Vinaigrette 


  • 3 Tbsp. minced shallots
  • 3 Tbsp. dijon mustard
  • 2 Tbsp. red wine vinegar
  • 2 Tbsp. water
  • 1 Tbsp. safflower oil
  • 1 tsp. dried tarragon
  1. Mix all the ingredients in a bowl and mix well.
I got this recipe from the food section of Huffington Post. I'm addicted to that site. If you see me glued to my iPhone I'm most likely scanning through articles. I get a lot of recipe inspiration that way! This vinaigrette has somewhat of a bite (must be the shallots), so use sparingly.